BGP Configuration between a Cisco IOS XE and Junos Router
Configuring BGP between Cisco and Juniper routers is a goal that all network engineers will encounter during their careers. Let's take a look at how it's done using a Cisco CSR 1000v router and a virtual SRX router by Juniper. The configuration we use today may be adjusted to work on other Cisco and Juniper device families.
What is BGP?
BGP, short for Border Gateway Protocol, is the most fundamental routing protocol on the Internet. Without BGP, the Internet would instantaneously collapse.
Why is this the case? Different networks around the world are divided into autonomous systems and allocated an AS number. For example, imagine you wanted to start your own Internet Service Provider company. To do so, you would need to obtain your own globally unique AS number. You would then set up BGP sessions with other ISP companies and exchange route table information. Without these BGP sessions, no other networks in the world would know of your networks existence and vice-versa.
The routers running BGP tell each other:
"these are the routes that I'm aware of, tell me the routes that you are aware of"
Couple this concept with some route aggregation to avoid massive routing-tables and you can get a basic idea of how the Internet is built.
The BGP lab we'll build today
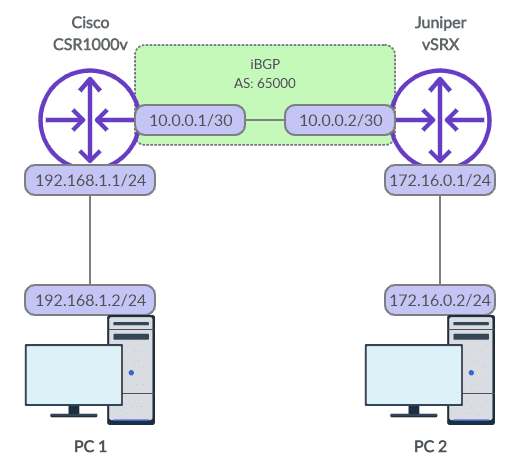
The best way to learn is by example, so let's build a BGP session from scratch. Check out the topology in the diagram below - we'll configure an internal BGP session (iBGP), which means that both BGP peers are part of the same autonomous network. In a future blog post, we'll detail the differences between internal and external BGP.
Figure 1: BGP Network Diagram
Configure interfaces on both routers
To get started, let's configure the interfaces on our routers.
For Cisco.
conf t
!
interface GigabitEthernet1
 ip address 10.0.0.1 255.255.255.252
 no shut
 exit
!
interface GigabitEthernet2
 ip address 192.168.1.1 255.255.255.0
 no shut
 exit
For Juniper.
configure
#
set interfaces ge-0/0/0 unit 0 family inet address 10.0.0.2/30
set interfaces ge-0/0/1 unit 0 family inet address 172.16.0.1/24
Because the Juniper device blocks traffic by default, we'll also need to allow BGP traffic and ICMP for testing.
set security zones security-zone trust interfaces ge-0/0/0
set security zones security-zone trust interfaces ge-0/0/1
set security zones security-zone trust host-inbound-traffic system-services ping
set security zones security-zone trust host-inbound-traffic protocols bgp
Set up our LAN devices
Once the interfaces on our routers are setup, configure the IP addresses on the PCs. You may then run a ping test from PC 1 to the other network elements. You'll notice that PC 1 can reach the Cisco router no problem but is unable to reach the Juniper router or PC 2. This is because the Juniper router has no awareness of PC 1's network and as such doesn't know where to send return traffic.
In technical terms, the Juniper router will check its routing table and when it cannot locate the 192.168.1.0/24 network will drop the return traffic altogether.
How to configure BGP on Cisco
Let's now change that with BGP! Starting with the Cisco device we may configure the snippet below.
router bgp 65000
 bgp router-id 10.0.0.1
 neighbor 10.0.0.2 remote-as 65000
 redistribute connected
 exit
end
The first line sets the local AS number to 65000. Then, the router ID is set to the IP of the local interface - a router ID is simply a 32-bit value which must be unique among BGP peers; it is common practice to use an IP address from a local loopback interface. We haven't configured a loopback interface so we'll use our physical interface instead.
The third line of config sets the IP address of our BGP neighbour and it's AS number. As the AS number of our neighbour matches the local AS number the Cisco router will infer that the BGP type is internal rather than external.
The fourth line of config is critical. It tells the Cisco router to advertise networks configured on local interfaces. Without this line of config the network belonging to PC 1 would not be provided to the Juniper router.
How to configure BGP on Juniper
Similarly, let us now configure the Juniper router.
set routing-options router-id 10.0.0.2
set routing-options autonomous-system 65000
#
set protocols bgp group pc-group type internal
set protocols bgp group pc-group local-address 10.0.0.2
set protocols bgp group pc-group peer-as 65000
set protocols bgp group pc-group neighbor 10.0.0.1 export redistribute-connected
#
set policy-options policy-statement redistribute-connected from protocol direct
set policy-options policy-statement redistribute-connected then accept
#
commit and-quit
Besides the differences in syntax, the configuration is more or less the same. To achieve the same "redistribute connected" functionality, you can see that we had to create a policy statement which extended the configuration size by an extra two lines.
Verify our BGP session
That is it! We can now check our routing tables to see if the routes have been discovered.
For our Cisco device.
CSR1000v# show ip route
Codes: L - local, C - connected, S - static, R - RIP, M - mobile, B - BGP
       D - EIGRP, EX - EIGRP external, O - OSPF, IA - OSPF inter area
       N1 - OSPF NSSA external type 1, N2 - OSPF NSSA external type 2
       E1 - OSPF external type 1, E2 - OSPF external type 2
       i - IS-IS, su - IS-IS summary, L1 - IS-IS level-1, L2 - IS-IS level-2
       ia - IS-IS inter area, * - candidate default, U - per-user static route
       o - ODR, P - periodic downloaded static route, H - NHRP, l - LISP
       a - application route
       + - replicated route, % - next hop override, p - overrides from PfR

Gateway of last resort is not set

      10.0.0.0/8 is variably subnetted, 2 subnets, 2 masks
C        10.0.0.0/30 is directly connected, GigabitEthernet1
L        10.0.0.1/32 is directly connected, GigabitEthernet1
      172.16.0.0/24 is subnetted, 1 subnets
B        172.16.0.0 [200/0] via 10.0.0.2, 00:07:22
      192.168.1.0/24 is variably subnetted, 2 subnets, 2 masks
C        192.168.1.0/24 is directly connected, GigabitEthernet2
L        192.168.1.1/32 is directly connected, GigabitEthernet2
For our Juniper device.
root@vSRX> show route

inet.0: 5 destinations, 6 routes (5 active, 0 holddown, 0 hidden)
+ = Active Route, - = Last Active, * = Both

10.0.0.0/30        *[Direct/0] 00:47:30
                    > via ge-0/0/0.0
                    [BGP/170] 00:00:04, MED 0, localpref 100
                      AS path: ?, validation-state: unverified
                    > to 10.0.0.1 via ge-0/0/0.0
10.0.0.2/32        *[Local/0] 00:47:30
                      Local via ge-0/0/0.0
172.16.0.0/24      *[Direct/0] 00:35:46
                    > via ge-0/0/1.0
172.16.0.1/32      *[Local/0] 00:35:46
                      Local via ge-0/0/1.0
192.168.1.0/24     *[BGP/170] 00:00:04, MED 0, localpref 100
                      AS path: ?, validation-state: unverified
                    > to 10.0.0.1 via ge-0/0/0.0
If you can see the new routes added to your routing tables you should now be able to ping from PC 1 to PC 2.
Here are some other useful troubleshooting commands.
On the Cisco device, you can run these to check the routes advertised and received via BGP.
CSR1000v# show ip bgp neighbors 10.0.0.2 advertised-routes
BGP table version is 4, local router ID is 10.0.0.1
Status codes: s suppressed, d damped, h history, * valid, > best, i - internal,
              r RIB-failure, S Stale, m multipath, b backup-path, f RT-Filter,
              x best-external, a additional-path, c RIB-compressed,
              t secondary path, L long-lived-stale,
Origin codes: i - IGP, e - EGP, ? - incomplete
RPKI validation codes: V valid, I invalid, N Not found

     Network          Next Hop            Metric LocPrf Weight Path
 *>   10.0.0.0/30      0.0.0.0                  0         32768 ?
 *>   192.168.1.0      0.0.0.0                  0         32768 ?

Total number of prefixes 2

CSR1000v# show ip bgp neighbors 10.0.0.2 routes
BGP table version is 4, local router ID is 10.0.0.1
Status codes: s suppressed, d damped, h history, * valid, > best, i - internal,
              r RIB-failure, S Stale, m multipath, b backup-path, f RT-Filter,
              x best-external, a additional-path, c RIB-compressed,
              t secondary path, L long-lived-stale,
Origin codes: i - IGP, e - EGP, ? - incomplete
RPKI validation codes: V valid, I invalid, N Not found

     Network          Next Hop            Metric LocPrf Weight Path
 * i  10.0.0.0/30      10.0.0.2                      100      0 i
 *>i  172.16.0.0/24    10.0.0.2                      100      0 i

Total number of prefixes 2
And on the Juniper device, you may run these similar commands.
root@vSRX> show route receive-protocol bgp 10.0.0.1

inet.0: 5 destinations, 6 routes (5 active, 0 holddown, 0 hidden)
  Prefix                  Nexthop              MED     Lclpref    AS path
  10.0.0.0/30             10.0.0.1             0       100        ?
* 192.168.1.0/24          10.0.0.1             0       100        ?

root@vSRX> show route advertising-protocol bgp 10.0.0.1

inet.0: 5 destinations, 6 routes (5 active, 0 holddown, 0 hidden)
  Prefix                  Nexthop              MED     Lclpref    AS path
* 10.0.0.0/30             Self                         100        I
* 172.16.0.0/24           Self                         100        I
Hopefully, these examples helped your understanding of BGP in a multi-vendor environment. If you have any questions, feel free to leave a comment beneath the post and we'll do our best to help.
Ultra Config Generator
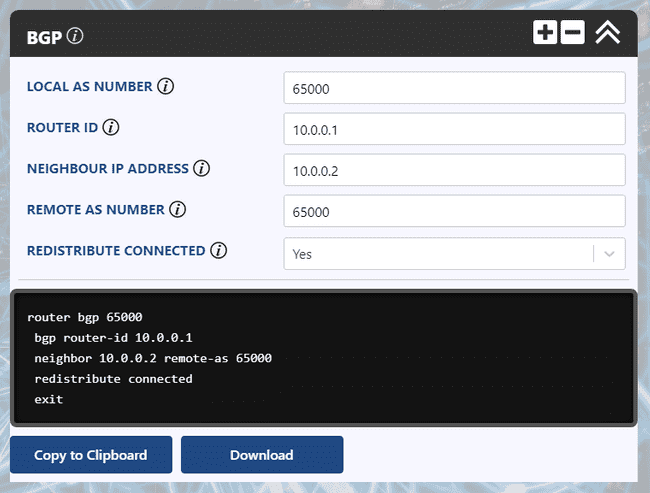
You can download two templates of the configuration discussed below and import them into your Ultra Config Generator instance. A screenshot of the Cisco template in action is shown for illustration.
Download:
bgp-cisco-2019-08-05.json
bgp-juniper-2019-08-05.json
Figure 2: UCG BGP Template for Cisco
If you haven't heard of Ultra Config Generator, I would highly recommend you check it out. We designed the product to allow network engineers to generate and automate network configuration in a highly flexible, efficient and elegant manner. Our users love the application and I hope that you will too.
Take care until next time!
Ultra Config
JOIN THE DISCUSSION
Subscribe to the Blog
Subscribe now and never miss a new post!
Success! You'll now receive emails when new blogs are posted.

