Configuring Static Routes on Junos
How can we configure static routing on Junos? And how can we use route preferences for more granular control? That will be the subject of today's topic.
What is a static route?
As you probably know, a static route is a manual entry in a routing table. When you check the routing table of a network device, you'll notice that routes can come from a number of different sources. These can be routes learned from dynamic routing protocols such as BGP and OSPF or they can be from manual entries as is the case with static routes.
A static route will always have two mandatory parameters configured at a minimum.
- Destination Network - The static route will only be relevant to destination addresses contained within this network
- Next Hop IP Address - To reach the destination network the device will forward traffic to the next hop address provided.
What is a default route?
Arguably, the most common example of a static route used in practice would be the default route which is a catch-all traffic path. If a default route is configured on a device then it will route all traffic to the provided next hop if a more specific routing entry doesn't exist in the routing table.
How to configure a static route on a Juniper router
Let's now take a look at the configuration structure of a default route on a junos device. In this example the default route will use the address 10.0.0.1 as the default gateway.
routing-options {
  static {
    route 0.0.0.0/0 {
      next-hop 10.0.0.1;
    }
  }
}
This example is simple to configure in practice.
configure
set routing-options static route 0.0.0.0/0 next-hop 10.0.0.1
commit and-quit
Similarly, we may configure static routes for non-default destinations by replacing the destination network with a more specific subnet.
configure
set routing-options static route 192.168.0.0/16 next-hop 10.0.0.1
commit and-quit
In the example above we are telling the device to add a static route for the destination network 192.168.0.0/16 with a next-hop address of 10.0.0.1.
How to verify a static route on a Juniper router
Once configured, we can check the routing table on our junos device to verify the existence of our static route.
root@vSRX> show route 192.168.0.0/16

inet.0: 1 destinations, 1 routes (1 active, 0 holddown, 0 hidden)
+ = Active Route, - = Last Active, * = Both

192.168.0.0/16     *[Static/5] 00:00:12
                    > to 10.0.0.1 via ge-0/0/0.0
What are route preferences?
One important thing to notice here is the preference value of our static route. The default value of a static route will have a preference value of 5. Lower values will increase the precedence of the route in the event of multiple entries for the same destination network.
The cool thing to note here is that we can actually utilize these preference values to create some useful behaviour in our network. For example, you might increase the preference value of a static route above 170 such that it will be overridden by BGP routes which have a default preference value of 170. More commonly, though, you might want to add a backup path to a static route such that in the event of a primary link failure traffic will automatically flow through the alternate path.
How to configure an explicit route preference
Let's have a look at this in practice using an example.
routing-options {
  static {
    route 192.168.0.0/16 {
      next-hop 10.0.0.1;
      qualified-next-hop 172.16.1.1 {
        preference 25;
      }
    }
  }
}
The above configuration block creates two next hop addresses for the destination network 192.168.0.0/16. The first is the address 10.0.0.1 which retains the default preference value of 5 and the second is the address 172.16.1.1 which is assigned a preference value of 25. Following the rules of precedence, the device will route traffic out the preferred path of 10.0.0.1 but will use the other path in the event that this address is not directly reachable. The qualified-next-hop command simply exists to allow us to configure options on the next-hop hierarchical level rather than on entire static route level.
The commands to configure this example are straightforward.
configure
set routing-options static route 192.168.0.0/16 next-hop 10.0.0.1
set routing options static route 192.168.0.0/16 qualified-next-hop 172.16.1.1 preference 25
commit and-quit
We may now check our routing table again to verify the existence of the backup path.
root@vSRX> show route 192.168.0.0/16

inet.0: 2 destinations, 2 routes (2 active, 0 holddown, 0 hidden)
+ = Active Route, - = Last Active, * = Both

192.168.0.0/16     *[Static/5] 00:00:12
                    > to 10.0.0.1 via ge-0/0/0.0
                    [Static/25] 01:58:21
                    > to 172.16.1.1 via ge-0/0/1.0
As expected, the route entries exist with the correct preference values assigned. Please note that the command above will only display entries for reachable next hop addresses. If a next hop is not reachable the route will no longer be active but can still be observed by adding the keyword extensive to the end of the show route command.
Hopefully, these examples helped your understanding of static routing on junos. If you have any questions, feel free to leave a comment beneath the post and we'll do our best to help.
Ultra Config Generator
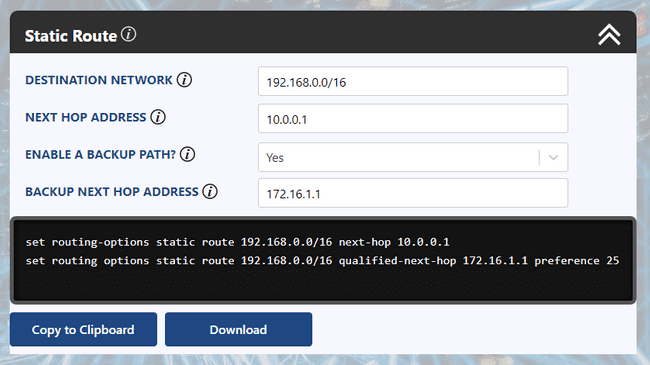
You can download a configuration template for static routing on junos below and import it into your Ultra Config Generator instance. We've also shown a screenshot of the template in action.
Download: static-route-2019-07-03.json
Figure 1: UCG Static Route Template
If you haven't heard of Ultra Config Generator, I would highly recommend you check it out. We designed the product to allow network engineers to generate and automate network configuration in a highly flexible, efficient and elegant manner. Our users love the application and I hope that you will too.
Take care until next time!
Ultra Config
JOIN THE DISCUSSION
Subscribe to the Blog
Subscribe now and never miss a new post!
Success! You'll now receive emails when new blogs are posted.
