DHCP Server Configuration on a Cisco ISR Router running IOS XE
Let's take a look at the configuration required for a DHCP Server on an IOS XE router. For this post, we'll be using a Cisco ISR 1100 Series router but the configuration may be adjusted to work on any IOS XE device.
What is DHCP?
We'll start this post with a quick definition of DHCP.
DHCP is an acronym short for Dynamic Host Configuration Protocol. The protocol essentially allows client devices such as smartphones, computers, and routers to automatically obtain IP addresses without needing to be manually configured. This is pretty essential in our modern world. Imagine having to manually assign yourself an IP address every time you connect to a Wi-Fi hotspot; what a massive pain that would be.
Today's DHCP Lab
With that said, let's get onto the configuration of a basic DHCP server.
First, we'll need to enter configuration mode on our ISR router.
conf tHow to configure a DHCP pool
We may now configure a simple DHCP pool.
ip dhcp pool PC_POOL
 network 10.0.0.0 255.255.255.0
 default-router 10.0.0.1
 dns-server 8.8.8.8
 exit
In this example, we create a DHCP pool entitled "PC_POOL" and configure it with the network 10.0.0.0/24. The network assigned to the pool is the IP range from which clients will be allocated addresses. The default-router value of 10.0.0.1 is the IP address clients will automatically configure as their next-hop IP address. We also configure a DNS server in this example - clients connecting to our DHCP server will use the server 8.8.8.8 for performing domain name resolution.
How to exclude an IP range from a pool
We often want to block specific addresses within our DHCP pool such that they cannot be allocated to clients. This can be useful if we want to reserve certain IP addresses on the network for manual management. Let's show an example of that.
ip dhcp excluded-address 10.0.0.1 10.0.0.10This line of configuration will instruct our router to reserve addresses in the range from 10.0.0.1 to 10.0.0.10.
Configure interfaces on the DHCP pool range
Now that we have a DHCP server configured we'll proceed to configure a layer 3 interface with the address of our default-router.
interface Vlan10
 ip address 10.0.0.1 255.255.255.0
 no shutdown
 exit
This configuration creates a Virtual LAN interface and assigns an address matching the default-router of our pool.
We can now go on to configure a physical access port for a client to connect to. You'll notice that the VLAN-ID configured on the access port matches the index of our VLAN interface.
interface GigabitEthernet0/1/0
 switchport access vlan 10
 no shutdown
 exit
That is all to get going! Connect a laptop to the physical port GigabitEthernet0/1/0. You'll notice an IP assignment of 10.0.0.11; this is the first free address after our reserved range.
How to verify DHCP bindings
We can also verify the allocation using a simple command on our router. Leave configuration mode with the "end" command before executing.
Router# show ip dhcp binding
Bindings from all pools not associated with VRF:
IP address      Client-ID/              Lease expiration        Type       State      Interface
                Hardware address/
                User name
10.0.0.11       018c.1645.3d45.6c       Jul 14 2019 09:18 AM    Automatic  Active     Vlan10
If all is well you should see an output similar to the above.
How to assign a static IP to a particular MAC address
We mentioned earlier in the post that it can be useful to reserve IP addresses in a pool for manual management. Assume we want our laptop to have a static IP of 10.0.0.5. We can create this setup quite easily.
First, let's disconnect our laptop from the router and clear the existing DHCP lease.
clear ip dhcp binding 10.0.0.11Next, enter configuration mode once again.
conf tWe may now configure a new DHCP pool but this time we'll only add one address to the pool. You'll also notice the client-identifier attribute configured with the MAC address of our laptop.
ip dhcp pool WEBSERVER_STATIC
 host 10.0.0.5 255.255.255.255
 client-identifier 018c.1645.3d45.6c
 default-router 10.0.0.1
 dns-server 8.8.8.8
 exit
That is all we need. Connect your laptop once again and this time you'll notice the static assignment of 10.0.0.5
Router# show ip dhcp binding
Bindings from all pools not associated with VRF:
IP address      Client-ID/              Lease expiration        Type       State      Interface
                Hardware address/
                User name
10.0.0.5        018c.1645.3d45.6c       Infinite                Manual     Active     Vlan10
Hopefully, these examples helped your understanding of DHCP servers on the IOS XE platform. If you have any questions, feel free to leave a comment beneath the post and we'll do our best to help.
Ultra Config Generator
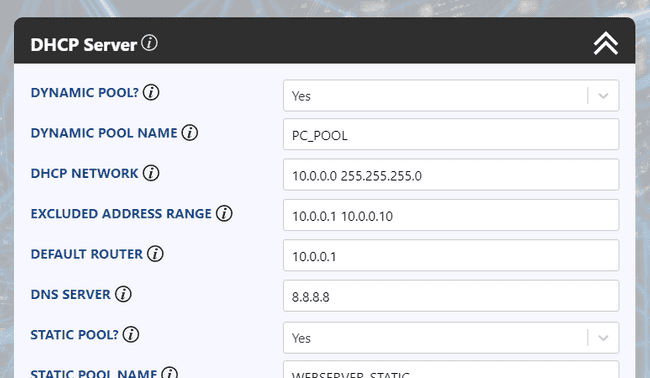
You may download a template of the configuration discussed and import it into your Ultra Config Generator instance. We've also shown a screenshot of the template in action.
Download: dhcp-server-2019-07-13.json
Figure 1: UCG DHCP Server Template
If you haven't heard of Ultra Config Generator, I would highly recommend you check it out. We designed the product to allow network engineers to generate and automate network configuration in a highly flexible, efficient and elegant manner. Our users love the application and I hope that you will too.
Take care until next time!
Ultra Config
JOIN THE DISCUSSION
Subscribe to the Blog
Subscribe now and never miss a new post!
Success! You'll now receive emails when new blogs are posted.
