How to Configure an IPV6 Interface on a Cisco Router
(UPDATE: We now have a video demo to accompany this post! Check it out on YouTube.)
Today, we'll take a look at how to configure an IPV6 address on a Cisco router. We'll use a Cisco ISR 1100 Series router but the configuration may be adjusted to work on any IOS XE device.
IPV6 is the future
Once you get a grasp on the fundamentals it's time to begin working on the CLI. We'll start with an interface config in today's post.
Enter configuration mode
First, we'll need to enter configuration mode on our ISR router.
conf tHow to enable IPv6
Next, we'll need to enable IPV6 routing on the top level. Without this line of config, the device won't route any IPV6 packets.
ipv6 unicast-routingHow to configure an IPV6 interface using EUI-64
We are now ready to configure the actual interface. Before we do that, recall a typical IPV4 configuration like the one below.
interface GigabitEthernet0/0/0
 ip address 10.0.0.2 255.255.255.252
 no shutdown
 exit
!
The IPV6 interface configuration will be very similar. Instead of using a subnet mask to specify the network portion of the address we'll use the prefix length notation.
The prefix length of an IPV6 address will almost always be 64.
interface GigabitEthernet0/0/0
 ipv6 address 2001:CBA9:FFAA:4321::/64 eui-64
 no shutdown
 exit
!
You'll also notice that we didn't specify the last 64 bits of the address and instead added "eui-64". This config option allows the interface to automatically assign itself a unique 64-bit interface ID.
Check out the IEEE Standard to understand how EUI-64 assignment works.
How to verify our interface config
We may now verify that the interface address was correctly generated and assigned using the operational command below.
show ipv6 interface GigabitEthernet0/0/0Here is a sample output of the desired result.
Router# show ipv6 interface GigabitEthernet0/0/0
GigabitEthernet0/0/0 is up, line protocol is up
  IPv6 is enabled, link-local address is FE80::7A0C:F0FF:FE52:B180
  No Virtual link-local address(es):
  Global unicast address(es):
    2001:CBA9:FFAA:4321:7A0C:F0FF:FE52:B180, subnet is 2001:CBA9:FFAA:4321::/64 [EUI]
  ...
You'll notice that a Link-Local address has been assigned within the network FE80::/10 with the last 64 bits matching the interface ID of our global unicast address.
How to configure an IPV6 interface without using EUI-64
Another point we must highlight - the EUI-64 method of interface ID assignment is not mandatory of course. You can easily manually assign the full IPV6 address by omitting this option.
interface GigabitEthernet0/0/0
 ipv6 address 2001:CBA9:FFAA:4321:7A0C:F0FF:FE52:B180/64
 no shutdown
 exit
!
How to ping an IPv6 interface
Finally, if you want to ping the address you configured from an adjacent Cisco router you'll need to add the "ipv6" option into your ping command.
ping ipv6 2001:CBA9:FFAA:4321:7A0C:F0FF:FE52:B180ULTRA CONFIG GENERATOR
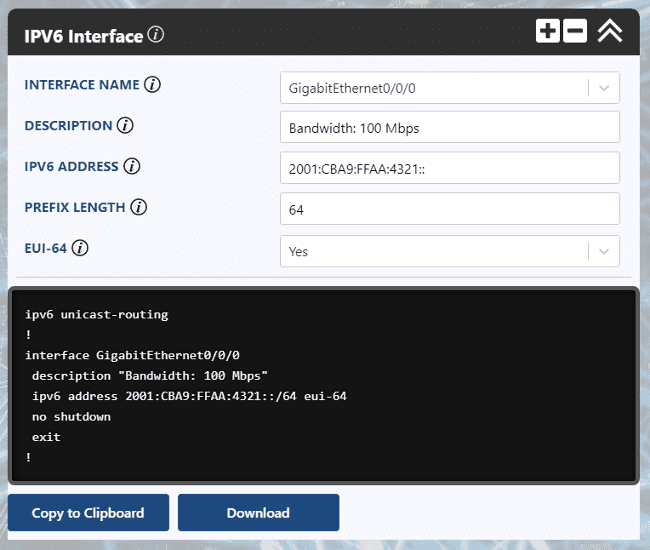
You may download a template of the configuration discussed and import it into your Ultra Config Generator instance. We've also shown a screenshot of the template in action.
Download: ipv6-interface-2019-09-15.json
Figure 1: UCG IPV6 Interface Template
If you haven't heard of Ultra Config Generator, I would highly recommend you check it out. We designed the product to allow network engineers to generate and automate network configuration in a highly flexible, efficient and elegant manner. Our users love the application and I hope that you will too.
Take care until next time!
Ultra Config
JOIN THE DISCUSSION
Subscribe to the Blog
Subscribe now and never miss a new post!
Success! You'll now receive emails when new blogs are posted.
