How to Packet Capture on a Cisco ASA Firewall
Monitoring traffic on a network is a powerful troubleshooting technique that most network engineers employ. Today's post will delve into the details of how to packet capture on a Cisco ASA firewall.
The power of the packet capture
Having the skill to capture traffic within a network is essential for any ambitious network engineer. Countless times during my career I've been able to diagnose network issues with this technique.
The most frequent use case for a packet-capture is to debug a connectivity issue between two nodes. Step one would usually involve checking the routing table to ensure an entry exists for both nodes. If the routing looks good but the nodes are still unable to reach each other, it might be time to perform a packet capture - this will allow the user to isolate the location of the issue. Is the issue related to a firewall policy? Does it exist between the nodes or on one of the nodes themselves? Is the problem existent in one direction or both?
Setting up our lab on GNS3
For today's example, we'll set up a Cisco ASAv firewall with a direct connection to a PC on GNS3. Let's begin the setup by configuring an interface on the ASA which will connect directly to our PC. We'll assign the interface a security level of 100 to ensure the firewall doesn't block any traffic incoming from the PC.
conf t
!
interface GigabitEthernet0/0
 nameif INSIDE
 security-level 100
 ip address 10.0.0.1 255.255.255.252
 no shut
 exit
!
end
Next, we'll configure an interface on our virtual PC with an address of 10.0.0.2/30 and connect it to our ASA.
PC-1> ip 10.0.0.2/30 10.0.0.1
Checking for duplicate address...
PC1 : 10.0.0.2 255.255.255.252 gateway 10.0.0.1
A quick ping test should now reveal that the two nodes can reach each other.
How to perform a packet capture
Let's now begin capturing all traffic on the INSIDE interface of our ASA with the command below.
capture pc-traffic interface INSIDE match ip any anyIn our example, we entitled our capture buffer with the label "pc-traffic". Any phrase can be substituted here.
After another ICMP execution from the PC, we can check the captured traffic with the show capture command.
ciscoasa# show capture pc-traffic

6 packets captured

   1: 23:23:46.920286       10.0.0.2 > 10.0.0.1 icmp: echo request
   2: 23:23:46.920454       10.0.0.1 > 10.0.0.2 icmp: echo reply
   3: 23:23:47.922346       10.0.0.2 > 10.0.0.1 icmp: echo request
   4: 23:23:47.922452       10.0.0.1 > 10.0.0.2 icmp: echo reply
   5: 23:23:48.923826       10.0.0.2 > 10.0.0.1 icmp: echo request
   6: 23:23:48.924039       10.0.0.1 > 10.0.0.2 icmp: echo reply
6 packets shown
If at any point you want to check all active captures running in the background you may do so as follows.
ciscoasa# show capture
capture pc-traffic type raw-data interface INSIDE [Capturing - 456 bytes]
  match ip any any
Let's now halt our running capture - it's important to carry out this step at the end of each session to conserve system resources.
no capture pc-traffic interface INSIDEHow to use capture filters
Another good practice is to avoid capturing all traffic on an interface and instead limit the match criteria provided. Not only will this conserve system resources but it also makes it easier to analyse the output by discarding unwanted data.
The example below will only capture TCP traffic with a port destination of 22. This capture filter would be useful for troubleshooting SSH traffic.
capture pc-traffic-ssh interface INSIDE match tcp any any eq 22How to print captured packets to the terminal in real-time
Instead of viewing the captured packets with the show capture command, we can also view the traffic as it is captured in real-time. Run the command in the output below and then send some TCP traffic on port 22 from the PC to the ASA. You should see the TCP SYN packets captured as they hit the interface in real-time.
ciscoasa# capture pc-traffic-ssh interface INSIDE real-time

Warning: using this option with a slow console connection may
         result in an excessive amount of non-displayed packets
         due to performance limitations.

Use ctrl-c to terminate real-time capture


   1: 00:19:38.404413       10.0.0.2.5000 > 10.0.0.1.22: S 846461035:846461035(0) win 2920 <mss 1460,nop,nop,timestamp 1565569178 0,nop,wscale 1>
   2: 00:19:39.404855       10.0.0.2.5000 > 10.0.0.1.22: S 1973203391:1973203391(0) win 2920 <mss 1460,nop,nop,timestamp 1565569179 0,nop,wscale 1>
   3: 00:19:40.405359       10.0.0.2.5000 > 10.0.0.1.22: S 686322589:686322589(0) win 2920 <mss 1460,nop,nop,timestamp 1565569180 0,nop,wscale 1>
3 packets shown.
0 packets not shown due to performance limitations.
How to save a packet capture for Wireshark
Let's now imagine you want to move the captured PCAP data to a desktop for detailed analysis. It's no secret that Wireshark is far more user-friendly than any kind of command-line analysis, so how could you do this? Simply set up a TFTP/SCP server or plug in a USB and move the captured file using the standard Cisco copy command. We'll show an example below for a TFTP server.
copy /pcap capture:pc-traffic-ssh tftp://<server-ip-address>Hopefully, these instructions helped your understanding of how to perform a packet capture on the Cisco ASA series. If you have any questions, feel free to leave a comment beneath the post and we'll do our best to help.
Ultra Config Generator
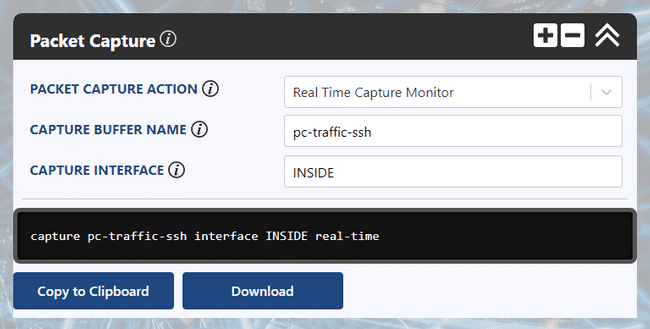
You can download a template of the configuration discussed above and import it into your Ultra Config Generator instance. A screenshot of the Packet Capture template in action is shown for illustration.
Download: packet-capture-2019-08-12.json
Figure 1: UCG Packet Capture Template for the Cisco ASA Series
If you haven't heard of Ultra Config Generator, I would highly recommend you check it out. We designed the product to allow network engineers to generate and automate network configuration in a highly flexible, efficient and elegant manner. Our users love the application and I hope that you will too.
Take care until next time!
Ultra Config
JOIN THE DISCUSSION
Subscribe to the Blog
Subscribe now and never miss a new post!
Success! You'll now receive emails when new blogs are posted.
