RESTCONF Tutorial - Everything you need to know about RESTCONF in 2020
(UPDATE: We now have a video demo to accompany this post! Check it out on YouTube.)
As you may know, NETCONF is an incredibly powerful protocol for automating the management of network devices. What about RESTCONF, though? What is it and why was it invented? Also, how can we use RESTCONF in the real world by managing configuration on a Cisco router? These questions will be the topic of today's discussion.
RECAP, WHAT IS NETCONF?
You may have read some of our previous blog posts on NETCONF. In these posts, we explained the NETCONF protocol in detail. If you'd like to do a deep dive on NETCONF, check them out. Otherwise, here is a quick recap.
Network devices may be managed through several options. Most network engineers are familiar with the CLI (Command Line Interface). The CLI is the most human-friendly interface.
When it comes to automation, however, the CLI is not the best choice. For software to be robust, there is a requirement for strict data structures. And CLI commands and outputs are usually just strings of data without much structure.
The NETCONF protocol solves this problem. It allows network devices to be managed through Remote Procedure Calls (RPCs). These RPCs contain well-defined XML messages that are very easy to handle inside software applications.
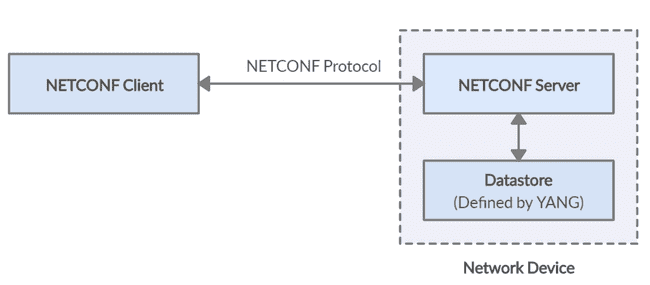
The diagram below highlights the major components involved in a NETCONF transaction.
Figure 1: NETCONF Components
Looking at Figure 1, there are three key takeaways to remember.
- The NETCONF client sends RPC messages to the network device under management.
- The NETCONF server running on the device will then interact with the datastore which contains configuration data and state data.
- The attributes inside the datastore are defined by YANG models.
WHAT IS RESTCONF?
With our NETCONF recap out of the way, let's now define RESTCONF. According to RFC 8040:
"RESTCONF is an HTTP-based protocol that provides a programmatic interface for accessing data defined in YANG, using the datastore concepts defined in NETCONF."
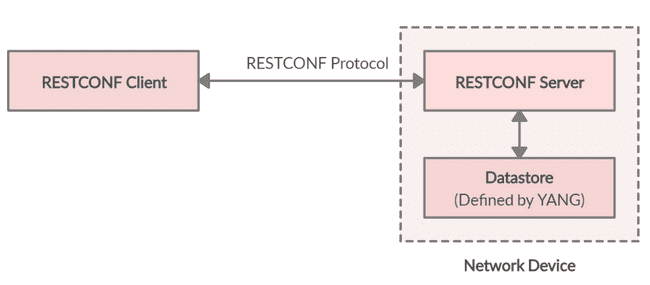
Your first reaction might be that it sounds very similar to NETCONF. And indeed, you would be right. Check out the conceptual components of RESTCONF in the diagram below. Notice the similarity to Figure 1.
Figure 2: RESTCONF Components
WHY USE RESTCONF WHEN WE ALREADY HAVE NETCONF?
If RESTCONF and NETCONF look so similar conceptually, then why have another protocol in the first place?
To answer this, we need to think about the trends of the tech industry. It's no secret that businesses all around the world are digitizing themselves through automation. And what is the most popular protocol used in the modern era for automation?
The answer to that is HTTP-based REST APIs.
With that said, let's now think about compatibility in a world without RESTCONF.
Imagine a company invested a huge sum of money on automating it's business processes through REST APIs. And once that work was complete, they decided to automate their network configuration management. They could easily hit a roadblock at this point. The software they use for automation would need to support the NETCONF protocol. Also, their software developers would need to be skilled up to learn this protocol.
You can see the dilemma here. Businesses want to keep their solutions as simple as possible. Ideally, they would use common applications and protocols across their organization.
This is where RESTCONF comes to the rescue. It allows users to automate their network infrastructure using familiar RESTful API patterns.
NETCONF VS RESTCONF
Now that we understand the need for RESTCONF, let's do a side-by-side comparison of some of the key lower-level differences between the protocols.
How are CRUD (Create, Read, Update, Delete) operations differentiated in a request?
The NETCONF protocol specifies the operation by wrapping the message content in an XML tag. Eg, <get-config>, <edit-config>
The RESTCONF protocol specifies the operation using an HTTP method. Eg, GET, POST, PUT, PATCH, DELETE
What format does data encoding use?
The NETCONF protocol requires RPC messages to always be encoded with XML.
The RESTCONF protocol allows data to be encoded with either XML or JSON.
How is configuration data and state data exposed to clients?
A NETCONF client will use multiple levels of depth in an XML message to specify the location of data.
A RESTCONF client with use the resource path in the URL of the request to specify the location of data.
RESTCONF IN REAL LIFE
As always, practical examples are the best way to learn. So let's manage the configuration on a Cisco router using RESTCONF. In our lab, we're running a Cisco CSR router on GNS3.
To get started, we must enable RESTCONF on our router. To do so, run the commands below.
conf t
!
username admin privilege 15 secret admin
!
ip http secure-server
!
restconf
We'll also need to configure an interface so that we have a layer 3 endpoint we can connect to.
interface GigabitEthernet1
 ip address 192.168.159.10 255.255.255.0
 no shut
 exit
!
end
HOW TO VERIFY RESTCONF IS RUNNING
We can now verify our RESTCONF server is up and running with a quick curl test.
curl -k https://192.168.159.10/restconf/ -u "admin:admin"If everything is well, you should receive a response similar to the one below.
<restconf xmlns="urn:ietf:params:xml:ns:yang:ietf-restconf">
  <data/>
  <operations/>
  <yang-library-version>2016-06-21</yang-library-version>
</restconf>
HOW TO DISCOVER THE URL PATH OF A RESOURCE
If you've studied YANG models before, you'll know that network devices can support multiple YANG models concurrently. Eg, Native models, IETF models, OpenConfig models. For the remainder of this tutorial, we'll be using the Cisco IOS-XE native model.
Let's start by retrieving the full running configuration.
curl -k https://192.168.159.10/restconf/data/Cisco-IOS-XE-native:native/ -u "admin:admin"A large XML object will be returned. We can then look through the levels of depth to figure out the URL path of resources. (Alternatively, you can read through the source of the YANG models or use a tool like YANG Explorer.)
For example, we can retrieve the interface configuration of "GigabitEthernet 1" using the curl request below.
curl -k https://192.168.159.10/restconf/data/Cisco-IOS-XE-native:native/interface/GigabitEthernet=1 -u "admin:admin"The configuration is returned as an XML object.
<GigabitEthernet xmlns="http://cisco.com/ns/yang/Cisco-IOS-XE-native"  xmlns:ios="http://cisco.com/ns/yang/Cisco-IOS-XE-native">
  <name>1</name>
  <ip>
  <address>
    <primary>
      <address>192.168.159.10</address>
      <mask>255.255.255.0</mask>
    </primary>
  </address>
  </ip>
  <mop>
    <enabled>false</enabled>
    <sysid>false</sysid>
  </mop>
  <negotiation xmlns="http://cisco.com/ns/yang/Cisco-IOS-XE-ethernet">
    <auto>true</auto>
  </negotiation>
</GigabitEthernet>
HOW TO USE JSON IN RESTCONF
One of the best things about RESTCONF is the support for JSON. Let's rerun our curl command for retrieving the interface configuration, but this time we will include an additional header.
curl -H "Accept: application/yang-data+json" -k https://192.168.159.10/restconf/data/Cisco-IOS-XE-native:native/interface/GigabitEthernet=1 -u "admin:admin"The "Accept" header tells the RESTCONF server we want our response returned as JSON.
{
  "Cisco-IOS-XE-native:GigabitEthernet": {
    "name": "1",
    "ip": {
      "address": {
        "primary": {
          "address": "192.168.159.10",
          "mask": "255.255.255.0"
        }
      }
    },
    "mop": {
      "enabled": false,
      "sysid": false
    },
    "Cisco-IOS-XE-ethernet:negotiation": {
      "auto": true
    }
  }
}
RESTCONF IN PYTHON
Let's set one final challenge for the day. Let's configure an interface using a python program and RESTCONF.
First, we'll need to install an HTTP client.
pip install requestsWe'll now create a new file for our program entitled "restconf_tutorial.py". At the head of the file, we'll import our dependencies.
#!/usr/bin/env python

# Filename:                     restconf-tutorial.py
# Command to run the program:   python restconf-tutorial.py

import requests
import json
Our router does not have an SSL certificate installed. As a result, HTTPS requests to our router will produce certificate-related warnings. We can suppress these warnings with the code below.
# Suppress HTTPS warnings
from urllib3.exceptions import InsecureRequestWarning
requests.packages.urllib3.disable_warnings(category=InsecureRequestWarning)
As we'll be working with JSON, we can also define a function that will pretty print our returned data.
# Print a stream of bytes as pretty JSON
def printBytesAsJSON(bytes):
	print(json.dumps(json.loads(bytes), indent=2))
Before we configure an interface, let's redo our earlier request for retrieving interface configuration.
# Retrieve configuration through RESTCONF
response = requests.get(
	url = 'https://192.168.159.10/restconf/data/Cisco-IOS-XE-native:native/interface/GigabitEthernet=1',
	auth = ('admin', 'admin'),
	headers = {
		'Accept': 'application/yang-data+json'
	},
	verify = False)

# Pretty print our JSON response
printBytesAsJSON(response.content)
Executing the program now yields the same result as our earlier curl request.
{
  "Cisco-IOS-XE-native:GigabitEthernet": {
    "name": "1",
    "ip": {
      "address": {
        "primary": {
          "address": "192.168.159.10",
          "mask": "255.255.255.0"
        }
      }
    },
    "mop": {
      "enabled": false,
      "sysid": false
    },
    "Cisco-IOS-XE-ethernet:negotiation": {
      "auto": true
    }
  }
}
HOW TO CONFIGURE AN INTERFACE USING RESTCONF
We are now ready to complete our final challenge.
We'll use a "PATCH" request to merge our new interface config. Add the code below to configure the "GigabitEthernet 2" interface with the address 10.10.10.1/24.
# Configure an interface through RESTCONF
response = requests.patch(
	url = 'https://192.168.159.10/restconf/data/Cisco-IOS-XE-native:native/interface/GigabitEthernet=2',
	auth = ('admin', 'admin'),
	headers = {
		'Accept': 'application/yang-data+json',
		'Content-Type': 'application/yang-data+json'
	},
	data = json.dumps({
		'Cisco-IOS-XE-native:GigabitEthernet': {
			'ip': {
				'address': {
					'primary': {
						'address': '10.10.10.1',
						'mask': '255.255.255.0'
					}
				}
			}
		}
	}),
	verify = False)

# Print the HTTP response code
print('Response Code: ' + str(response.status_code))
When executed, we'll get a response code of 204.
Response Code: 204Finally, we can jump onto the CLI of our router to verify the change did indeed occur.
Router#show running-config interface GigabitEthernet 2
Building configuration...

Current configuration : 99 bytes
!
interface GigabitEthernet2
 ip address 10.10.10.1 255.255.255.0
 shutdown
 negotiation auto
end
There we go, that's everything essential we need to know about RESTCONF!
That'll be it for today. I hope you enjoyed the tutorial! And as always, stay tuned for more!
ULTRA CONFIG GENERATOR
The RESTCONF protocol is great at pushing configuration to network devices. But how can we automate the generation of network config?
Have you heard of Ultra Config Generator? If you haven't, I highly recommend you check it out.
We designed the product to allow network engineers to generate and automate network configuration in a highly flexible, efficient and elegant manner. Our users love the application and I hope that you will too.
Take care until next time!
Ultra Config
JOIN THE DISCUSSION
Subscribe to the Blog
Subscribe now and never miss a new post!
Success! You'll now receive emails when new blogs are posted.

